Hello lovelies,
I'm so excited to show you this manicure..actually there's three versions of it!
The theme of the Illamasqua's collection, Paranormal has inspired me and this manicure is supposed to depict tears through the fabric of the universe; between our universe and the one where ghosts, demons and other paranormal creatures live.
I have used Illamasqua Omen and A England Camelot.
And here is the awesome, 'paranormal' version! Gosh I loved how the green glows!
Then I said to myself: "Hang on, I could make this even more interesting, white glows under UV light too!" I've outlined the 'tears' and added some distress lines using white acrylic paint and this is the result:
Awesome, right? The Illamasqua Paranormal polishes are so much fun! below is a mattified version that actually looks like I've drawn on chalkboard :)
So that was the second post of the day. Did you like it? Would you like to try these new Illamasqua's UV glow polishes? They are available at illamasqua.com or at selected Sephoras.
Showing posts with label UV glowing. Show all posts
Friday, 14 June 2013
Wednesday, 12 June 2013
OPI Couture de Minnie Nail Art - My Minnie Mouse design
Hello lovelies,
so here is my Minnie Mouse nail art design! With only three creme polishes in the collection there is a small number of gradient colour combinations you can do so yes, some other bloggers have already done this. I can't remember which ones but if you leave me a link in the comment I can reference to them.
The accent finger features Minnie Mouse over gradient. I have used OPI A Definite Moust-Have,
Chic From Ears To Tail, Innie Minnie Mightie Bow, Minnie Style and acrylic paint.
Since I've gotten the new Illamasqua UV glow topcoat in Geist I wanted to try it out and test how different colours underneath it will influence the glow. It looks interesting and it did not influence the colours in daylight. I've partly painted the accent finger so you can see the difference with and without topcoat. Cool, right?

*Some products in this post were provided for review
so here is my Minnie Mouse nail art design! With only three creme polishes in the collection there is a small number of gradient colour combinations you can do so yes, some other bloggers have already done this. I can't remember which ones but if you leave me a link in the comment I can reference to them.
The accent finger features Minnie Mouse over gradient. I have used OPI A Definite Moust-Have,
Chic From Ears To Tail, Innie Minnie Mightie Bow, Minnie Style and acrylic paint.
Since I've gotten the new Illamasqua UV glow topcoat in Geist I wanted to try it out and test how different colours underneath it will influence the glow. It looks interesting and it did not influence the colours in daylight. I've partly painted the accent finger so you can see the difference with and without topcoat. Cool, right?

*Some products in this post were provided for review
Labels:
Acrylic paint,
Creme,
Glitter,
Illamasqua,
Layering,
Nail Art,
OPI,
UV glowing
Wednesday, 5 June 2013
Deadly sins Challenge: Pride! Cube Nail art over Illamasqua Ouija, UV glowing nail polish
Hello lovelies,
It's the last week of the Deadly sins Challenge and the theme is Pride. I want to show you my best try at doing 3D cubes design and re-creating Illamasqua logo. I've had to re-do both nails twice as I wasn't happy with them but the result is nice..I think :)
I have followed tutorial by Copy That, Copy Cat on how to paint the 3D cubes. She coloured them randomly whereas I've opted for a regular pattern.
I've used Illamasqua Ouija UV Glowing nail polish and acrylic paint.
The whole nail art comes to life when under UV light! I love how the 3D cubes stand out!
It's the last week of the Deadly sins Challenge and the theme is Pride. I want to show you my best try at doing 3D cubes design and re-creating Illamasqua logo. I've had to re-do both nails twice as I wasn't happy with them but the result is nice..I think :)
I have followed tutorial by Copy That, Copy Cat on how to paint the 3D cubes. She coloured them randomly whereas I've opted for a regular pattern.
I've used Illamasqua Ouija UV Glowing nail polish and acrylic paint.
The whole nail art comes to life when under UV light! I love how the 3D cubes stand out!
Labels:
Acrylic paint,
Illamasqua,
Nail Art,
Pink,
UV glowing
Tuesday, 4 June 2013
Review and swatches of Illamasqua Paranormal Collection polishes in Omen, Seance and Ouija
*PR Sample
Hello lovelies,
I finally got to the new Illamasqua polishes that glow under UV light! They are all from Paranormal collection and they are so versatile!
About the collection:
"Illamasqua is opening the doorway to a new dimension. Dare to come in? Go where you have never been before. Give in as beauty takes control.
It is time to awaken the aura you have repressed for so long, and explore a new universe of unexpected textures and formulas. Embrace the distorted reflection in a cracked mirror; the candle that suddenly extinguishes in a sealed room; a window has opened, allowing you to penetrate the fragile membrane of a twin existence, the paranormal world.
After all, why be normal, when you can be paranormal?"
Omen - bright green base with silver foil particles. The colour is bright, almost neon and great for Summer. It instantly reminded me of the Wicked Witch's green face :D The formula was truly great as it applied very easily and the pigmentation was excellent. Two regular coats were enough for full coverage. The drying time was average and the polish dries into a satin finish. I've applied topcoat to get glossy finish.
The polish has a very strong bright yellowish green glow, the kind that glow-in-the-dark polishes have only stronger.
Ouija - pink fuchsia base colour with silver foil particles. This is my favourite colour of all three, it's very girly and suits my skin tone best. It applied very easily a there were no streaks visible after the polish dried. The pigmentation was excellent, two regular coats were fully opaque. I thought that even one coat was almost perfect. The drying time is average and it dries into satin finish. I've applied topcoat to get glossy finish.
The colour changes into bright neon pink with orange undertones when under UV light. Love it!
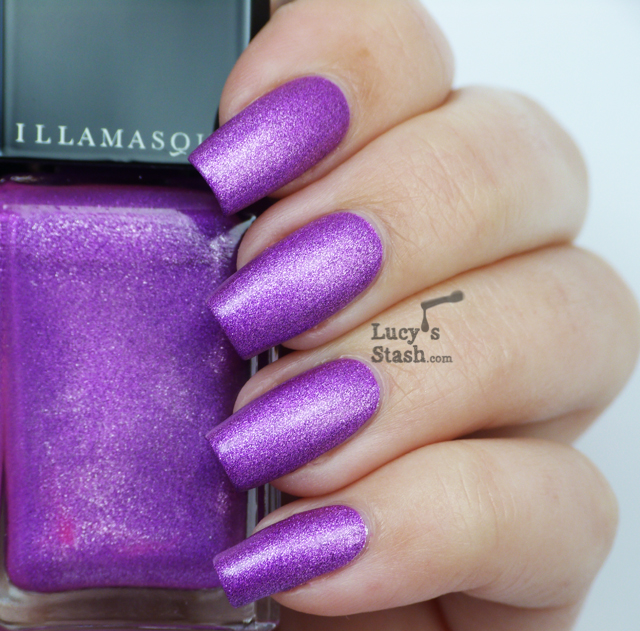
Seance - grape purple base with silver foil particles. It's a very gorgeous purple that is actually much warmer in real life, more red undertones. It applied just flawlessly but the polish seems to get slightly thicker the more you use it. Nail polish thinner will solve this problem. On the other hand the pigmentation was excellent, it was almost one coater. I did end up applying two coats to get perfect coverage. it also dried satin so I've used a topcoat.
If you'd like to see a nail art design with this shade, visit this post.
Seance glows in bright pink neon colour when under UV light. The glow is really strong and you can see a fine grain in the polish and that is the silver foil particles.
Oh guys I've had so much fun with these polishes and there's some creative nail art coming very soon! They are very versatile and offer new ways to do nail art. The designs look completely under UV light and transform into something unique.
All polishes had great formulas with excellent pigmentation. I'll be reviewing the UV glow topcoat in Geist separately so stay tuned!
Illamasqua polishes are available at your usual outlets like Sephora and at Illamasqua's website.
*PR Sample
Labels:
Green,
Illamasqua,
Pink,
Purple,
UV glowing
Thursday, 30 May 2013
Holiday Clubbing manicure that glows under UV light! Featuring Illamasqua Paranormal collection polishes and Barry M Nail Art Pen White
Hello lovelies,
I've had to remove this manicure from the previous post as it was conflicting with the rules (entry for the Travel Supermarket contest) so here they are in a separate post :)
I've done this manicure on Friday for Saturday's nail blogger meet up in London and couldn't wait for sharing it with you! I call them a 'Holiday Clubbing' manicure. This would be a perfect mani for going out in the evening as it glows under UV/black light!
I have used Illamasqua Seance, Ouija and Omen as the UV glowing polishes and Barry M Nail Art Pen in White for the outline.
How to do this design:
Step 1: Paint your nails with Illamasqua Seance and let it dry properly.
Step 2: Start drawing triangles from the centre of the nail outwards with Barry M Nail Art Pen in White.
Step 3: Fill in some of the triangles with Ouija and Omen polishes using small brush.
Step 4: Draw the white triangles again with Barry M Nail Art Pen in White again for it to stand out.
Step 5: Seal with topcoat.
Let the magic happen!
I've had to remove this manicure from the previous post as it was conflicting with the rules (entry for the Travel Supermarket contest) so here they are in a separate post :)
I've done this manicure on Friday for Saturday's nail blogger meet up in London and couldn't wait for sharing it with you! I call them a 'Holiday Clubbing' manicure. This would be a perfect mani for going out in the evening as it glows under UV/black light!
I have used Illamasqua Seance, Ouija and Omen as the UV glowing polishes and Barry M Nail Art Pen in White for the outline.
How to do this design:
Step 1: Paint your nails with Illamasqua Seance and let it dry properly.
Step 2: Start drawing triangles from the centre of the nail outwards with Barry M Nail Art Pen in White.
Step 3: Fill in some of the triangles with Ouija and Omen polishes using small brush.
Step 4: Draw the white triangles again with Barry M Nail Art Pen in White again for it to stand out.
Step 5: Seal with topcoat.
Let the magic happen!
Labels:
Barry M,
Green,
Illamasqua,
Nail Art,
Pink,
Purple,
UV glowing,
White
Subscribe to:
Posts (Atom)