Showing posts with label Gradient. Show all posts

Saturday, 20 July 2013

Gold gradient nail art with Shimmer Tracy and Bad Apple Jelly Pink Apple

Hello lovelies,

I've got another pretty gradient here for you. I've used two coats of Bad Apple Jelly Pink Apple as a base colour and then created glitter gradient using Shimmer Polish Tracy. The ring is from ASOS.com

Lucy's Stash - Gold gradient nail art with Shimmer Tracy and Bad Apple Jelly Pink Apple


Have a great weekend everyone!

Tuesday, 18 June 2013

Gradient Nail Foil Manicure feat. Born Pretty Store Nail Foils

*PR sample

Hello lovelies,

I'm very excited to show you today's nails. I've loved them so much I kept constantly looking at them and I've worn them for days! Firstly, let's take a look at the nails before I tell you more :)

Lucy's Stash: Gradient nail foil manicure feat. Born Pretty Store nail foils


So now you've seen them....aren't they gorgeous? Like colourful beetles on my nails!

I have used Born Pretty Store nail foils #21 and #24. They are gradient and there's quite a lot of them in each jar. BPS sells many different types of nail foils so you don't have to restrict yourself to the gradient ones. If you'll be shopping you can use my 10% discount code LHJ61.

The pictures were taken the next day as the pictures in light box hardly pictured the beauty of them. Because of the delay there are light cracks that appeared overnight. There's no tutorial this time but I plan to do one next time I use gradient nail foils.

Just one more thing - don't use regular topcoat on nail foils otherwise they will crinkle. Use water-based topcoat if you can get your hands on one. I'm currently testing one but it is not on sale yet so can't tell you more I'm afraid.

Lucy's Stash: Gradient nail foil manicure feat. Born Pretty Store nail foils


The nail foils come in these jars...

Lucy's Stash: Gradient nail foil manicure feat. Born Pretty Store nail foils


So what do you think? Would you wear all-foiled-nails? I certainly loved the look!

*PR sample

Monday, 17 June 2013

The Perfect Manicure For Your Evening Dress

Hello lovelies,

I have partnered with lovely Jenny Crompton and we are bringing you some dress and manicure inspiration!

When it comes to glamorous evening events, one of the highlights is picking out that perfect outfit. Whether it’s a prom, a wedding, or a special romantic date, once you've chosen your dress it's time to make some decisions about your hair, your make up, and of course... your manicure.

Here are just a few scenarios for evening dresses and tips on how they can influence your choice of manicure.

Quaint country wedding

If you turn up to a classy family wedding in a revealing bodycon dress, you might find yourself outlawed, so stick to floaty florals and pretty pastels.


With its chic rose detail and perfect peach tones, the Rare Rose Bodice Skater Dress is the ideal accompaniment to a romantic summer wedding. In terms of manicure you might choose a classic French style, with nude, understated tones or very subtle gradient. Needless to say, this is not an outfit to combine with bright, gregarious colours – think bare naturals and mother of pearl.

Lucy would pair this dress with a simple gradient or just painted nails without nail art with peach shades like China Glaze Peachy Keen.


Lucy's Stash: Gradient nail art


There is always the opportunity to go a little more glam with touches of diamanté, with this Floral Bandeau Prom dress. You could even go glittery with a textured polish and pick out some of the fabric's darker tones to make an impact.


Lucy has created bespoke manicure inspired by this dress using watercolours and OPI Alpine Snow as a base. She has opted for a bit more colourful version.


Lucy's Stash: Watercolour/aquarelle nail art


And this is how it's done:


Lucy's Stash: Watercolour/aquarelle nail art tutorial


Out on the town

If you're hell bent on making a statement with a bright block-coloured dress such as the Renee Katie Criss Cross Roll Neck Dress, think contrast. More lime green would be extremely overpowering, so instead you might consider a black polish. If nail art is your thing, delicate green lines would be enough to tie in with the dress.


The OPI Don’t Talk Bach To Me matches this dress great but it might be too much so you can wear more subtle version with glitter gradient to give it more bling…


Lucy's Stash: Gradient nail art


The Quontum Strappy Bodycon is a dress which screams nail art. On the front, this appears to be nothing more than an LBD, but turn around and it's much more than that. Vibrant pink and contrasting black nail designs would carry on the theme of the dress perfectly.


What you do with your nails largely depends upon the type of event you're attending, as well as the dress you've chosen. You might be surprised at how disastrous a poor nail/dress combination can be. But finger nails are extremely visible when it comes to eating, drinking and communicating – after all, you do have ten of them!

Lucy has done another bespoke manicure inspired by this dress using OPI You Callin’ Me A Lyre?, A England Camelot and OPI If You Moust You Moust.

Lucy's Stash: Dress inspired nail art design


Inspired? I hope so ;)

Thanks to Jenny for this lovely collaboration and inspiring me to do these nail art designs!


*This is a collaboration post and I have been somewhat compensated

Tuesday, 11 June 2013

Fashion Stripe Nail Art with Zoya Summer PixieDust polishes

Hello lovelies,

Quick first post of today (hopefully I'll post another one later). I've tried to do a gradient with Zoya Summer PixieDust polishes... I wasn't entirely happy with the gradient by itself so I've added a bold black stripe on the nail.

The shades I've used: Zoya Solange, Beatrix, Destiny, Miranda and Dahlia.

Lucy's Stash - Nail Art with Zoya PixieDust Summer polishes


 This is how the gradient looked without the stripe, kinda bland if you ask me..

Lucy's Stash - Gradient with Zoya PixieDust Summer polishes

Monday, 11 March 2013

Subtle Gradient Nails with Nicole By OPI Polishes

Hello lovelies,

Hope you're all well! Today I have here just a simple gradient using Nicole By OPI My Jay Or The Highway and Am I Making Myself Claire?. Both polishes are part of the Modern Family collection I've reviewed here.

Lucy's Stash - Subtle Gradient Nails


I just wanted to share how I did this gradient. I've painted two stripes next to each other with both polishes and 'stamped' it on the nail.

Lucy's Stash - Subtle Gradient


Wednesday, 27 February 2013

Money Smart Nail Art - you don't need expensive tools to produce great nail art!

Hi everybody!

I have decided to enter a competition that is held by Money Supermarket. In this post I'd like to kind of sum up tips & tricks in nail art and nail art tools without the need of a big investment. There are several ways how to save your pennies and still have beautifully decorated nails. I'm sure many of you already know these tips and use it regularly but hopefully this article will help some of you who don't.

1. Home made dotting tools - if you don't want to buy set of dotting tools there's a way to make some of them at home. You can use old pen, pencil, bobby pin, differently sized pins, back of a nail art brush...:


You can also create simple patterns with them...


2. Create stunning designs with tape! - You don't need anything more than scissors and a tape you already have got at home. The paper masking tape you would use while painting your house is the best but you can also use a bank tape or regular scotch tape. Scotch tape is very sticky so it is always best to stick it to your arm first to make is less sticky.


With tape you can create stripy and colour-block manicures very easily:


If you own craft scissors you can cut waves or zig-zag patterns and create stunning designs:


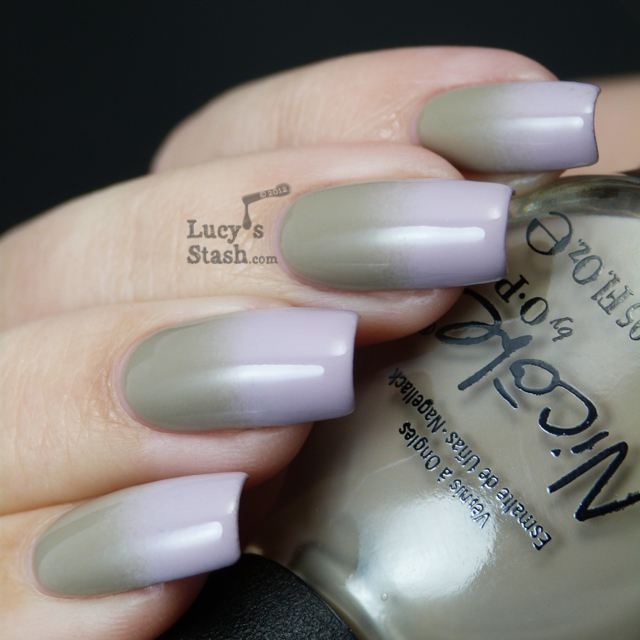
3. Use PVA glue as a peel-off base coat - Glitter nail polish is always a pain to remove but with this simple tip it won't be anymore! Apply a thin layer of PVA glue on your bare nails, let it dry and paint your nails as usual. When you want to remove the nail polish use orange stick to scrape the polish off. No hassle!

If you don't already own PVA glue you can buy it at just £1 in Poundland :)


4. Use makeup sponge to create gradient effect - a plain triangle makeup sponge lying in your dresser can be used to create two or multi-tone gradients or even Galaxy nails effect. Simply paint nail polish stripes next to each other on the sponge and stamp it on the nails. Repeat until you're happy with the result. Another method is to paint nails with one colour, dip the makeup sponge into a different nail polish and dab the colour on the nail.


See? You don't need expensive tools to have trendy nails! Let me know what you think and share your super saving money tips in the comments!

Share this